


Fusion Applications: Extending the Domain with Oracle Access Manager
In my previous post I described the steps needed to configure Oracle Virtual Directory for virtualizing LDAP. In this post I will describe the steps that need to be taken to configure Oracle Access Manager and Webgate.
Oracle Access Manager allows users to seamlessly gain access to web applications and other IT resources across the enterprise deployments. It provides a centralized and automated single sign-on solution. It also contains an authorization engine, which grants or denies access to particular resources based on properties of the user requesting access as well as based on the environment from which the request is made.
Oracle Access Manager consists of various components including Access Server, Identity Server, WebPass, Policy Manager, WebGates, AccessGates, and Access SDK. The Access Server and Identity Server are the server components necessary to serve user requests for access to enterprise resources. WebGates are web server agents that act as the actual enforcement points for Oracle Access Manager.

To start the installer of Oracle Acces Manager (OAM), go to directory /u01/app/oracle/product/fmw/oracle_common/common/bin and issue the following command:
./config.sh
The installer start with the welcome screen with two options. Choose the option Extend an Existing Domain and click on Next. Now the Select Domain screen shows.

Select domain /u01/app/oracle/admin/IDMDomain/aserver/IDMDomain and click on Next.

On the screen above select only Oracle Access Manager with Database Policy Store and click on Next.

On the screen above provide database connection settings and click on Next. On the next screen the installer will test the connection to the database with these settings. You should see Test succesful in the result log section on the screen. Click on Next to continue. On the next screen choose option Managed Server and click on Next.

You will see two lines in the managed servers section. The first is the managed server for ODSM we configured previously. Leave these settings as is. On the second line change the managed server name to wls_oam1 and change the listening address to idmhost1.mycompany.com and click on Next. The Configure Cluster screen shows. Leave this screen empty, we are configuring a single node and click on Next.

On the screen above leave the first line as is, this is the machine for the AdminServer. On the second line change the Name and Node Manager Listening Address to idmhost1.mycompany.com and click on Next.

Select server wls_oam1 from the left pane and add it to server idmhost1.mycompany.com as shown in screenshot above and click on Next. Now the Configuration Summary shows with all configuration settings. Click on Extend and OAM will be installed.
After the installer finished succesfully go to directory /u01/app/oracle/product/fmw/oracle_common/common/bin and issue the command:
./pack.sh \
-managed=true \
-domain=/u01/app/oracle/admin/IDMDomain/aserver/IDMDomain \
-template=idmdomaintemplate.jar \
-template_name=IDMDomain_Template
Now in the same directory issue the command:
./unpack.sh \
-domain=/u01/app/oracle/admin/IDMDomain/mserver/IDMDomain/ \
-template=idmdomaintemplate.jar \
-overwrite_domain=true \
-app_dir=/u01/app/oracle/admin/IDMDomain/mserver/applications
This will recreate the managed server directory /u01/app/oracle/admin/IDMDomain/mserver/IDMDomain/with ODSM and OAM.
Start the AdminServer using the startall.sh script created in previous posts.
Log in the AdminServer through the url http://admin.mycompany.com and select Security Realms, Tab Providers and delete Authentication Provider IAMSuiteAgent.

The manual describes deleting Authentication Provider IDMDomainAgent.
The Oracle Access Manager IAMSuiteAgent replaces IDMDomainAgent.
IAMSuiteAgent provides Single-Sign On for the IDM domain consoles including the Oracle Identity Manager, Oracle Adaptive Access Manager and other Identity Management servers created during domain creation. It excludes Single-Sign On protection for Fusion Middleware Control and the WebLogic Server Administration Console. For FusionApplications Webgate will provide SSO, instead of IAMSuiteAgent.
So delete IAMSuiteAgent and click on Activate Changes from the left pane.
Configuring Oracle HTTP Servers to Display Login Page
Create a file called oam.conf in directory /u01/app/oracle/admin/ohs_inst1/config/OHS/ohs1/moduleconf and add the following lines:
<Location /oam>
    SetHandler weblogic-handler
    WebLogicCluster idmhost1.mycompany.com:14100
</Location>
Configuring Oracle HTTP Servers to Access Oracle Access Manager Console
Go to directory /u01/app/oracle/admin/ohs_inst1/config/OHS/ohs1/moduleconf and add location /oamconsole to the file admin.conf. This file will look like this.
NameVirtualHost *:7777

<VirtualHost *:7777>

   ServerName admin.mycompany.com:80
   ServerAdmin adminy@server.com
   RewriteEngine On
   RewriteOptions inherit
   RewriteRule ^/console/jsp/common/logout.jsp /oamsso/logout.html [PT]
   RewriteRule ^/em/targetauth/emaslogout.jsp /oamsso/logout.html [PT]

# Admin Server and EM
   <Location /console>
      SetHandler weblogic-handler
      WebLogicHost ADMINVHN.mycompany.com
      WeblogicPort 7001
   </Location>

   <Location /consolehelp>
      SetHandler weblogic-handler
      WebLogicHost ADMINVHN.mycompany.com
      WeblogicPort 7001
   </Location>

   <Location /em>
      SetHandler weblogic-handler
      WebLogicHost ADMINVHN.mycompany.com
      WeblogicPort 7001
   </Location>

   <Location /odsm>
      SetHandler weblogic-handler
      WebLogicCluster idmhost1.mycompany.com:7006
   </Location>

   <Location /oamconsole>
      SetHandler weblogic-handler
      WebLogicHost ADMINVHN
      WebLogicPort 7001
   </Location>

</VirtualHost>
Restart Oracle HTTP Server now to activate the changes.
Starting Oracle Access Manager
Before starting OAM, first go to create directory security in directory /u01/app/oracle/admin/IDMDomain/mserver/IDMDomian/servers/wls_oam1. In this new directory create a file called boot.properties and add weblogic admin user and password. This will stop the startup script from prompting us for admin username each time. The file will look like this.
username=weblogic
password=[yourAdminServerPwd]
Now go to directory /u01/app/oracle/admin/IDMDomain/mserver/IDMDomain/bin and issue the following command to start OAM Managed Server
./startManagedWebLogic.sh wls_oam1
After OAM is running you should be able to acces the OAM home page through the load balancer by url http://admin.mycompany.com/oamconsole. Log in with user weblogic.
Configuring Oracle Access Manager to use OID store
Click on the System Configuration tab. Expand Data Sources under Common Configurations, then Select User Identity Stores
Under Actions, click Create icon. On the Create User Identity Store Page, provide the following information.

Click on Apply and Test Connection to see if you can access the OID store.
Now new sections are added to this screen. Select Set a default store and Set as system store and click on the add icon for the section Access System Administration. Enter OAM* in the search field and click on Search button. From the results select OAMAdministrator group and click on Add Selected button. Screen will look as follows.

Click on Ok and a validate popup screen will apear. Enter user oamadmin and password you created during post Extending the domain with OID.

Click on Validate to check access to OID store.
Now click on the System Configuration tab. Select Access Manager Settings – Authentication Modules – LDAP Authentication Modules. Choose LDAP. Select Open from the Actions menu. Set User Identity Store to ID Store.

Click Apply. Restart OAM managed server. You are now able to login OAM console with users defined in OID, for example user oamadmin.
Creating Oracle Access Manager Policy Group
Log in to the OAM console at: http://admin.mycompany.com using the oamadmin account. From the Navigation Window expand: Application Domains > IAM Suite. Click Authentication Policies. Click on the Create icon on the tool bar. Enter the following information:

Click Apply.
Creating Oracle Adaptive Access Manager Policy Group
Same as creating OAM Policy group create OAAM Policy Group as follows.

Click on Apply.
Validating OAM
To validate OAM is properly using OID, we will create a simple test page and secure it using OAM.
Create a file called sso.html in directory /u01/app/oracle/admin/ohs_inst1/config/OHS/ohs1/htdocs. This file will look like this:
<html>
  <body>
   <center>
    <p>
     <h2>SSO Protected Resource</h2>
    </p>
   </center>
  </body>
</html>
We now need to create a resource in Oracle Access Manager and assign it to one of the policy groups we just created. Log in to the OAM console at http://admin.mycompany.com/oamconsole using the oamadmin account. From the Navigation window expand: Application Domains > IAM Suite. Click Resources. Click Open on the tool bar. Enter the following information:

Click Apply.
We can now access this resource at http://mycompany.com/sso.html without authentication. To enable OAM authentication using OID we need to front OAM with Oracle Webgate. WebGate intercepts HTTP requests from users for Web resources and forwards them to the Access Server for authentication and authorization.
We had not downloaded Webgate yet. You can download Webgate from eDelivery. Select Product Pack Oracle Fusion Middleware and Platform Linux x86-64. With OAM 11g we can use Webgate 11g and Webgate 10g. The installation manual describes steps for Webgate 1og, so we will download this.
![]()
During installation of Webgate the installer will prompt for the location of two libraries
- libstdc++.so.5 (default location on Oracle Enterprise Linux /usr/lib64)
- libgcc_s.so.1 (default location on Oracle Enterprise Linux /lib64)
mkdir /u01/app/oracle/product/fmw/iam/oam_lib/
ln -s /usr/lib64/libstdc++.so.5 /u01/app/oracle/product/fmw/iam/oam_lib/libstdc++.so.5
ln -s /lib64/libgcc_s.so.1 /u01/app/oracle/product/fmw/iam/oam_lib/libgcc_s.so.1
After downloading Webgate, I unzipped the installation files in directory /home/oracle/install/webgate.
Before we start the Webgate installer, we first need to create a Webgate Agent in OAM. Log in OAM at http://admin.mycompany.com/oamconsole and on the welcome screen click in icon New 10gWebgate. Provide values as follows:

Click on Apply. This will then create a file called ObAccessClient.xml in the directory /u01/app/oracle/admin/IDMDomain/aserver/IDMDomain/output/Webgate_sso. We will copy this file to the location of Webgate after installation.
Now reopen this agent by selecting System Configuration Tab. Select Access Manager Settings – SSO Agents – OAM Agent from the directory tree. Double-click the open folder icon. On the displayed search page click Search to perform an empty search. Click on the Agent Webgate_sso. Update values to look like follows:

Click on Apply. Now Click on tab Policy Configuration and select Host Identifiers – IAMSuiteAgent and add hostname admin.mycompany.com and port 80 as below to link this HostIdentifier to our loadbalancer. Remember we also configured the sso.html resource with this hostidentifer

Installing Webgate
We downloaded and extracted the installation files of Webgate in direcotory /home/oracle/install/webgate. Go to this directory and issue the command:
./Oracle_Access_Manager10_1_4_3_0_linux64_OHS11g_WebGate -gui
The installer starts and the Welcome screen is shown. Click on Next. On the next screen we have to supply a Linux user and group that Webgate will belong to. Set username to oracle and group to oinstall and click on Next.

Now the specify installation screen shows.
 Set installation location of Webgate to /u01/app/oracle/product/fmw/iam/webgate and click on Next. Now a verification screens is shown with the installation location and amount of harddisk space required for Webgate (124MB). Click on Next. Now the installer will prompt for the location of the libgcc_s.so.1 and libsdtc++.so.5 libs.
 We soft linked these libs to directory /u01/app/oracle/product/fmw/iam/oam_lib. Enter this location and click on Next.
 On this screen choose option Open Mode and click on Next.
 On this screen set Webgate ID to the agent we created in Acces Manager, being Webgate_msso. Supply the password we supplied when creating the agent in Acces Manager. Set Access Server to wls_oam1, hostname to idmhost1.mycompany.com and proxy port to 5575 and click on Next. On the next screen choose to automaticly update httpd.conf with the webgate configuration and click on Next.
 Enter the absolute path to httpd.conf as shown above and click on Next. On the next screen click on Next. Now a screen shows that if HTTP server is setup for SSL, manual configuration changes need to be made. Click on Next on this screen. Now a screen shows if we would like to read documentation of Webgate. Select No and click on Next. Now anther screen shows asking us to read the configuration document. Click on Next. Now a screen opens showing the Oracle CoreID Readme. Click on Next.

On the Installation Summary screen click on Finish to start the installation of Webgate. When the installer finishes successfully, copy file ObAccessClient.xml from directory /u01/app/oracle/admin/IDMDomain/aserver/IDMDomain/output/Webgate_mysso to directory /u01/app/oracle/fmw/iam/webgate/access/oblix/lib.
Copy file logout.html from directory /u01/app/oracle/fmw/iam/oam/server/oamsso to directory /u01/app/oracle/fmw/iam/webgate/access/oamsso and change line SERVER_LOGOUTURL to https://sso.mycompany.com:443/oam/server/logout.
Now open file httpd.conf in directory /u01/app/oracle/admin/ohs_isnt1/config/OHS/ohs1 and uncomment the following lines
#<LocationMatch "/oamsso//index.html">
#Satisfy any
#</LocationMatch>
#**********************************
Restart Oracle HTTP Server and open a browser. Enter url https://sso.mycompany.com:443/sso.html and you will now be prompted to enter credentials. Enter oamadmin and password. After this you will be able to see the protected page.
Let’s resume what happens when we request the protected page sso.html at https://sso.mycompany.com:443/sso.html
- user requests page sso.html through loadbalancer https://sso.mycompany.com:443
- loadbalancer forwards request to Oracle HTTP Server
- Webgate intercepts HTTP request and passes information to Oracle Access Manager
- Access Manager checks existing policies for this page, stored in the database
- Access Manager finds existing policies, autentication needed using Oracle Identity Directory
- Login page shows
- User enters credentials
- Credentials are passed to Access Manager, which in turn passes credentials to Oracle Identity Directory
- Oracle Identity Directory validates provided credentials against idstore (stored in the database)
- Oracle Identity Directory finds valid credentials and passes these back to Access Manager
- User can now see the requested protected page
Viewed 17872 times by 3913 visitors
15 Responses (last comment shown first)
Hi! Thanks for the great job, I’m now getting to know all this Fusion stuff and it’s pretty exciting. I came from PeopleSoft so much of this is quite new for me.
I’ve been following this blog about Fusion and completed these steps, but I’m realy not findind how to continue after this OAM and Webgate page. Can’t find where is the next post.
Thanks for helping
Hi Hakan, I have the same problem as Klass,
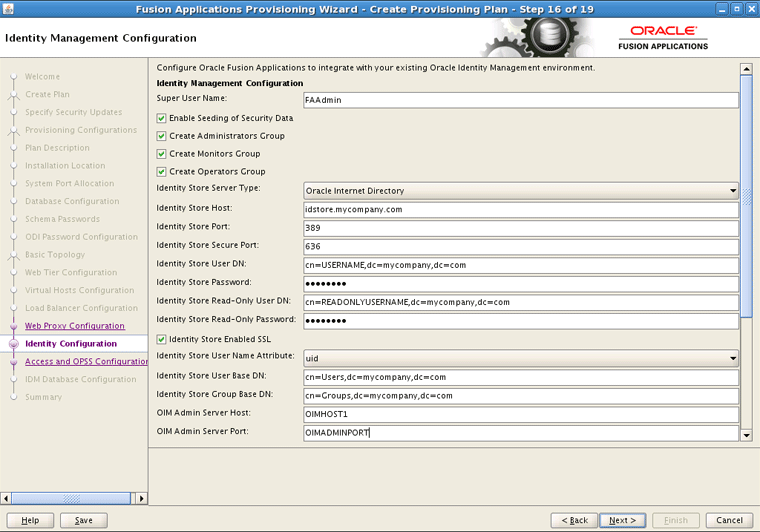
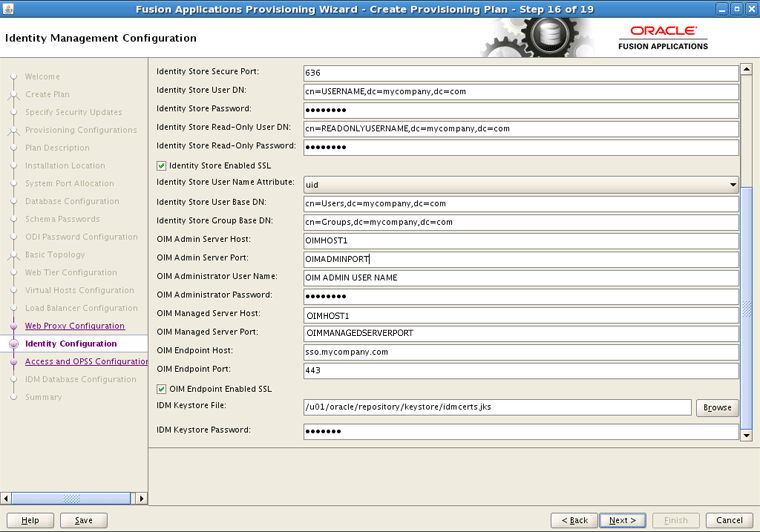
I also don’t know how to setup these fields:
http://docs.oracle.com/cd/E15586_01/fusionapps.1111/e16684/img/idm.png
http://docs.oracle.com/cd/E15586_01/fusionapps.1111/e16684/img/idm2.png
Can you please help us with this?
I get an error when running the provissioning.
The error says”failed to connect to ldap ldap://idstore.mycompany.com. verify and ensure connection details”
Best regards,
Juan Jesus Montero
Hi Hakan,
I’m still struggling with creating a provisioning plan. I’m not sure what to fill on on this setup fields:
http://docs.oracle.com/cd/E15586_01/fusionapps.1111/e16684/img/idm.png
http://docs.oracle.com/cd/E15586_01/fusionapps.1111/e16684/img/idm2.png
Can you please help me with this?
Best regards,
Klaas
Hi Hakan,
Thanks for the blogs, they are very detailed.
Are you also going to write a blog on how to create a new provisioning plan and how to deploy that to an environment?
Because I’m stuck at that part now.
Hello Anup
Were you able to resolve the “oracle.security.am.foundation.map.exceptions.MapRuntimeException: Failed to get encryption key.” error. Please share how you were able to resolve or any workarounds used
Thank you
Shiva
We are running into the same problem as Anup Anand (‘failed to get encryption key’ during OAM server startup).
Anup, did you ever resolve the problem and if so how ?
Hi Haken,
Excellent blog and detailed installation & configuration steps of IDM. To be frank without refering to your blog it is very diffcult to configure so many components of IDM.
You are doing good job thank you for sharing your knowledge.
I skipped SSL part and while createing webgate agent in OAM gave the url http://sso.mycompany.com:80 – completed webgate installation and configuration. Now url http://sso.mycompany.com/sso.html works after entering username/password.
Once again thankyou
Magesh
Hi Hakan,
Question. Currently i’m installing the second image for the Fusion Apps part and i’m finished the database installation. The current step i’m working on, is to run the RCU tool for fusionapps. But i’ve some error on the Secure Enterprise Search section and on the Fusion Applications section -> some ORA errors (creating index and REQUEST_HISTORY_VIEW).
I was wondering if you have these errors as well, amd did you already fixed those?
Please let me know something… Thanks in advance.
(if you want you can email me at michael@h2a-consultancy.nl)
Thanks in advance.
Kind regards,
Michael
Hi,
I have extended the domain as per the above instructions. Although i can start wls_oam1 server but errors are reflected in logs. Some of them are as below :
<Failed to get encryption key.
…
(thread=[STANDBY] ExecuteThread: ’2′ for queue: ‘weblogic.kernel.Default (self-tuning)’, member=n/a): Error while starting cluster: (Wrapped: Failed to start Service “Cluster” (ServiceState=SERVICE_STOPPED, STATE_ANNOUNCE)) oracle.security.am.foundation.map.exceptions.MapRuntimeException: Failed to get encryption key.
…
<Exception on bootstrap of component Config.
…
(Wrapped: Failed to start Service "Cluster" (ServiceState=SERVICE_STOPPED, STATE_ANNOUNCE)) oracle.security.am.foundation.map.exceptions.MapRuntimeException: Failed to get encryption key.
… and many more…
Now, once the OAM is in running mode, i can access my oamconsole. But the problem arises here when i try Signing-in.
Following error is seen in logs:
javax.servlet.ServletException: java.lang.NoClassDefFoundError: oracle/oam/foundation/configuration/datasources/DataSourceManagerImpl
at weblogic.servlet.internal.ServletStubImpl.execute(ServletStubImpl.java:341)
at weblogic.servlet.internal.TailFilter.doFilter(TailFilter.java:27)
at weblogic.servlet.internal.FilterChainImpl.doFilter(FilterChainImpl.java:57)
at oracle.adf.library.webapp.LibraryFilter.doFilter(LibraryFilter.java:176)
at weblogic.servlet.internal.FilterChainImpl.doFilter(FilterChainImpl.java:57)
at weblogic.servlet.internal.RequestDispatcherImpl.invokeServlet(RequestDispatcherImpl.java:524)… (Call Stack truncated)
Please point me what is the issue and how to rectify it.
Thanks,
Anup
Max,
I had some typos in the admin.conf file (thanks to Micheal for noticing). I updated the post with the correction of these typos. You may have taken over the typos. If so correct the admin.conf as stated in this post.
I just restarted the server and all the components in the following order OID, OHS, AdminServer, OAM. When starting Adminserver it logs errors where Webgate is searching for OAM. After starting OAM Managed Server errors in the log disapears and I can access all the consoles of AdminServer, EM and OAMConsole.
Please verify that all components started up.
Hakan
Hi Hakan
I have followed your posts and wanted to thank you for putting it together.
I have run into one issue after OAM and Webgate install. I can no longer access the admin console, em, odsm etc. Looks like the webgate is forwarding the request but ends up with a blank screen.
Any thoughts…
thanks and looking forward to the next post….
Michael,
You are absolutely right. Thanks for noticing the typos.
I corrected the typos.
Next post will follow soon, can’t make any promises when, due to other obligations …
Hakan
Hi Hakan,
I’ve noticed two typo’s in the admin.conf file on this blog.
1) You wrote “WebLogicClus ADMINVHN.mycompany.com”, but I think it should be “WebLogicHost ADMINVHN.mycompany.com” for the ods part
2) You wrote “WebLogicHost ADMINVHN WebLogicPort 7001.mycompany.com”, but i think it should be “WebLogicHost “ADMINVHN.mycompany.com WebLogicPort 7001″
Can you verify if these are correct?
BTW, when do you expect to publish the next blog? I can’t wait!
Kind regards,
Michael
Hi Danilo, I saw your comments saying you completed these steps. I am unable to access OAM console and when I started OAM managed server, I got below exception :
<Servlet: "AMInitServlet" failed to preload on startup in Web application: "oam".
java.lang.ExceptionInInitializerError
at oracle.security.am.engines.sso.adapter.SMEAdapter.(SMEAdapter.java:81)
at oracle.security.am.engines.sso.adapter.SMEAdapter.(SMEAdapter.java:96)
at oracle.security.am.engines.enginecontroller.SSOEngineController.processEvent(SSOEngineController.java:756)
at oracle.security.am.controller.MasterController.processEvent(MasterController.java:331)
at oracle.security.am.controller.MasterController.processRequest(MasterController.java:491)
at oracle.security.am.controller.MasterController.process(MasterController.java:433)
I have installed IAM 11.1.1.5.0 on Oracle Linux 5.7 64 bit with database 11.2.0.1, rcu 11.1.1.5.0, wls 10.3.5, jdk jrockit-jdk1.6.0_29-R28.2.2-4.1.0-linux-x64.bin. I see that even Hanak has done the installation in Oracle Linux 5.6 64 bit.
Can you please let me know why I am getting this exception. I hope Hakan also will reply to my concern.
Greately appreciate your suggestions.
thanks
Jytohi
[Reply to this comment]